Showing posts with label Cheap Stuff to Make. Show all posts

Sunday, December 1, 2013

Do-It-Yourself Advent Calendar

It's December 1st!  Which means it's advent calendar time!

The past few years, I got my kids those Lego advent calendars which were great and everything.  But this year, my kids are obsessed with Pokemon cards so I made a really easy and cheap version of my own.


The supplies were simple and all stuff I had around the house:

-  25 envelopes
-  Numbered scrap paper
- rubber cement (reg. glue would work fine too)
-  Pokemon cards (which I had bought for Christmas but decided to do this instead.  I got a random lot of 100 off Amazon - those suckers are expensive in the stores)
-  tape


I just cut out my numbers from the scrapbook paper and then glued them on the front of the envelopes.

I put two Pokemon cards in each envelope (one for each kid, each day).

Then I used a sponge and some water to seal them - because I don't lick envelopes.  I'm a snob.  


Then I just taped them around a door with regular old scotch tape.


It's a little festive.  It's a little fun.  It's a whole lot of cheap.  

Wednesday, March 27, 2013

Cheap Party Favors - Recycling, Minimal & Pretty

Birthday season is coming around again - which means I'm a crazy lunatic planning and plotting the perfect birthday party for a bunch of 7 year-olds.  I can be a little anal when it comes to birthday parties but it's fun, so I don't care.  Here, I'll show you how create cheap party favors that incorporate some of my latest passions.


Birthday Party Crackers!

Items Needed & Cost:

Empty toilet paper and paper towel rolls  (Free!  Save them as you go through them!)
1 package of tissue paper ($1 at the Dollar Tree)
Ribbon (I have a storage bin of curling and fabric ribbon.  If you don't, you can buy some at the Dollar Tree for $1)
Scotch Tape (I had this - Dollar Tree sells it for a $1)
3 bags of candy ($3 at the Dollar Tree)

Total Cost for me:  $4.  I made 24 of them, so it cost a whopping 17 cents each. 

Quick How To:


Gather your supplies.  If you have paper towel rolls, you'd probably want to cut them in half to make them about the same size as the toilet paper rolls.  

Take your package of tissue paper and cut it in half.  


Put your candy or whatever you want in the toilet paper roll.  Then, take 2 sheets of tissue paper.  Tape it to the roll and roll up the roll with the tissue paper.  Tape the tissue paper to keep it secure.  Double knot the ends with some curling ribbon.  


Use your scissors to curl the ribbon ends, and voila - you have a cheap, homemake party favor.  

Why I like these?

Cheap - These are cheap to make.  You could put whatever you want in them - but I chose non-chocolate candy.  So of course I picked up my loot at the Dollar Tree.  When you go to the Dollar Tree, you have to remember that not all candy is created equal.  Some of the candy they sell is so cheap because the bags are so small.  So when filling things like these or pinatas, I go for what gives me the biggest bang for my buck.  Here is my cost analysis of best Dollar Tree candy:

 Bubble Gum Balls - 72 individually wrapped pieces per bag (1.3 cents each)
Smarties - 26 rolls per bag (3.8 cents each)
Dum Dum Pops - 26 lollipops per bag (3.8 cents each)


Reduce, Reuse, Recycle!  - Instead of just tossing my toilet paper and paper towel rolls for 2 weeks, I just saved them.  Why buy plastic treat bags that are just going to end up in the garbage anyways?  Just one little thing to help the environment and all that other happy crap.  

Minimalist - Another thing I like about these things and the way I personally made them is that it teaches kids "portions" and all that other nonsense.  I did not want to put plastic crap that just gets thrown away in them.  They are pretty small so there isn't much candy in them.  Do kids really need a buttload of candy though?  Nah.  

Oh - and for the record, I'm pretty much a hypocrite because I have a piñata that is stuffed with way too much candy.  So these are just being used as a parting gift of sorts.  I'm taking baby steps with this minimalist crap.  

Friday, March 15, 2013

Do-It-Yourself Party Game: Ring Toss

I am kind of psychotic when it comes to my kids' birthday parties.  I just like planning unnecessary crap. It drives my husband crazy and I think that's why I like to do it so much.  One thing I have planned for this upcoming party is a Ring Toss Game.  The cost for me out of pocket was ZERO.  It would be pretty cheap otherwise.


We're doing a "Skylander" theme party - so we're calling this game, "Dino Rang Toss".  Dino Rang is a character on the game or something.  You can improvise based on whatever theme you choose (if you are fruity like me and do "theme" parties).  


First.  I don't drink.  So how was I going to get 48 beer bottles?  I asked friends!  Had 48 of them in a snap.  I did give one friend $2 because her husband usually turns them in for deposit.  She told me not too but whatever.  I'm too good like that sometimes.  I soaked them in soapy water and the labels all peeled off greatly and the beer smell left.  


I had a big box from Amazon that I was saving.  It was the perfect size for 48 bottles.  I reinforced it with some more packing tape.  I found a paint sample that I got for free from Valspar that was sitting, collecting dust in the basement.  So I used that to paint the box.  

We recently replaced our shower curtain rod which came with new rings.  So I saved the old, crappy, plastic rings - they work great for ring toss!  If you don't have old shower curtain rings laying around, you can pick them up cheap at the Dollar Tree or Wal-Mart (even though I hate Wal-Mart).  

I printed out the words, "Dino Rang Toss" and glued them on the box just for a little pizazz.  There you have it - a practically free and environmentally friendly party game.


Friday, February 8, 2013

Reuse the Kids' Socks - and Make Your Cats Happy

I HATE throwing away socks that the kids have outgrown.  I mean - a lot of them still have use left in them - but having someone use someone else's socks is pretty nasty.  So I usually just toss them, like 99% of the country.

I also HATE spending a ridiculous amount of money on cat toys.  For instance....


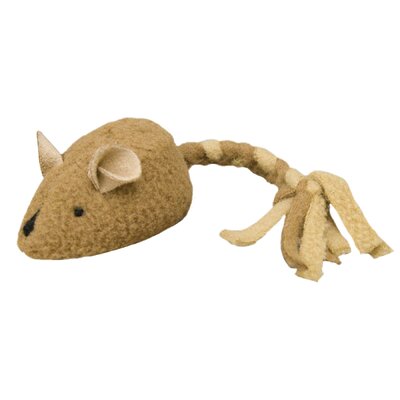
This Play-N-Squeak Mouse is a whopping $4.97 at Walmart!  Seriously?  So we turned our old socks into toys for the cat:


I got my supplies - old socks, scissors, rubber bands (did not use), ribbon (did not use), sharpie marker and cat nip (I had this in my house - I bought it at the Dollar Tree before Christmas because we were going to make something that we never did).


I cut up some of the socks for "filler".


I took the three socks that I was going to use as the toy and I cut the ends for tassel.


I filled the sock with some filler and some cat nip (not too much!)


We drew a silly face on it.  


Then we made more.  

I guess they kind of look like kitty sperm toys.  That wasn't my intention.  I just got lucky.  

REDUCE, REUSE, RECYCLE!


Saturday, January 12, 2013

Homemade Cereal Bars - Good on the Wallet, Happy in Kids' Mouths

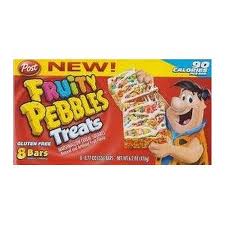
My kids love these:


And these:

But at $3 a box, I'm not having that.  My kids eat through them like no tomorrow.  Even with coupons and scoring them for $2 a box - you're still talking .25 cents or .33 cents per snack.  I'm cheap.  That's too much.

So I have resorted to making my own cereal bars - and once you start doing it often, it's so easy to make these that you wonder why you ever bought the packaged crap in the first place:


A 13"X9" batch gives me 15 bars (I cut 5 x 3).  Assuming you get the cereal on sale, the whole batch costs less than $3.  You'd be paying over $9 for the same amount of bars if you went with the pre-packaged crap.  

Here's the general recipe:

1 standard bag of marshmallows (mini or regular)
1/2 stick of butter
9 cups of cereal

Melt the butter and marshmallows in a big pot.  Turn off heat and add cereal until all mixed.  Put in greased 13"x9" pan and let cool.  When working the cereal in the pan, I suggest lubing up your hands/fingers with Crisco.  It makes it much easier.  

After it cools for a while, cut them in equal squares or whatever you want.  


If you're tempted by these creatures like I am - don't worry.  Each bar only has about 180 calories and 4 grams of fat.  Not too shabby at all.  

If you're one of those "really healthy" moms - this works great with Cheerios too.  

Monday, November 19, 2012

Santa Shop Creations: Pasta Angel Ornaments

This project is a little more time consuming than other projects I have done, but it's all good.  Still a good, cheap craft to pump out for the kids.


Materials Needed

Bow Tie Pasta, Rigatoni, Elbow Macaroni, & Acini Di Pepe - $1 a box, but you don't use much and I'm going to eat the rest with my family so actual cost of pocket for the craft is about .50 cents.

5/8" doll heads (pack of 34) - $3.99, used a 40% off coupon to make it $2.39

Gold Embroidery Floss - .39 cents

White Acrylic Paint - .69 cents

Paint Brush - I had this

Glue Gun & sticks - I had this

Sharpie Marker - I had this

Total cost:  $3.97.  This made 34 ornaments so they cost about .12 cents each to make.  


You pretty much just hot glue all the stuff together to make an angel.  I made one and realized it would be much easier to assembly line these angels.  So at first, I just glued all the heads to the rigatoni.  Then I glued a Bow Tie on the back of each one for the wings.  Then, I glued 2 elbows on the sides for arms.    Lastly, I threw a big dab of glue on the head and dipped the head in the Acini di Pepe for hair.  


Then I had my 34 little angels and I painted them.  This is the time consuming part.  I did 2 or 3 coats just to make them look better.  So every now and then, I would just go and paint them.  Let them dry, turn over and do another coat.  


When they were all done drying, I drew little happy faces on the head with a black sharpie.  Not really fancy, but I thought preschoolers would like it.  Then I tied loops with the embroidery floss and hot glued them up the back.  

This is really easy even for kids to do - although, they might burn themselves with the hot glue.  Then could paint them though. Very cheap, easy craft to pump out if you need to donate to a Santa Shop or whatever.  $4 for 34 is pretty darn good.  

Sunday, November 18, 2012

Santa Shop Creations: Cinnamon Ornaments

This was a bargaintastic Santa Shop creation!  I used this "Non-Edible Cinnamon Ornaments" recipe from Allrecipes as a guide.  I doubled it because it said that it only made 1 dozen ornaments.  I ended up with 72 ornaments.  Oops.


I did all my shopping for this at the Dollar Tree.  I spent a whopping $3. 

Materials Needed:

2  1-1/3 cup containers of cinnamon at the Dollar Tree - $1 each
1 4-pack  of apple sauce at the Dollar Tree - $1
2 Tablespoons of Nutmeg  - I had this
2 Tablespoons of Cloves - I only had about 1 Tablespoon so that's what I used
4 Tablespoons of Glue - I had this
Some 1/8" wide ribbon - I had this
Some more glue - I had this
Heart Shaped Cookie cutter (or whatever you want to make)
Straw

Total Cost:  $3.  Quantity Made:  72.  Cost per unit:  4 cents


1 cup Cinnamon
1 Tbsp Nutmeg
1 Tbsp Cloves
3/4 cup Applesauce
2 Tbsp Glue (like Elmers)

Mix cinnamon, nutmeg & cloves.  Add Applesauce and glue.  If it's too wet, add more cinnamon.  If it's too dry, add more applesauce.  Mine was too dry so I added about 1/4 cup more applesauce.  

Roll out dough to about 1/4 inch.  Make sure they are not too thin.  Use a plastic straw to make a ribbon hole.  

Bake in a 200 degree oven for a couple hours.  I flipped mine over after about an hour.  


This was so easy, the kids did most of the work.


We decided to just pump out hearts.  That was easy enough.


After we cut them out, we used plastic straw to make holes for the ribbon so we can hang them on the tree.


After they were cooked and dried, I cut ribbon in 5" strips.  You can make the strips however long or short you want.  Then I double knotted them and put some glue over the knots.  Once dry, I trimmed the end of the ribbon and you're done!  Lots of nice smelling, simple & pretty little ornaments.  

Can't beat $3 for 72 "gifts" for the Santa Shop!

Tuesday, November 13, 2012

Santa Shop Creations: Scented Pinecone Ornaments

My original plan for this craft was to be virtually free.  Unfortunately, pinecones are hard to come by in my area.  Luckily, scented pinecones are on sale at Michaels this week for 50% off.  I will try to recon some pinecones from my family in the future for next year's possible Santa Shop.


Items Needed:

1 bag of pinecones - $4.99, on sale for $2.50
1 spool of red ribbon - .50 cents
hot glue gun - already had
hot glue sticks - already had

Total Cost:  $3.00

These materials produced 18 items - for a total product cost of .17 cents each.  

The bag contained 20 pinecones, but two of them were kind of gross and unacceptable for use.  The instructions are very easy - cut 6" pieces of ribbon and hot glue them to the pinecone.  I was done with 18 of them in about 10 minutes - and 3 of those minutes were waiting for the glue gun to heat up.  


There you have it.  18 simple ornaments to be sold at the son's Santa Shop this December.  Nothing fancy.  In case you haven't read my other Santa Shop Creation posts, my son's preschool lets the kids "shop" for their families the week before Christmas.  They rely on donations for the kids to buy.  So it's sort of a mini fundraiser.  They like to keep items priced between .25 cents and $1.00.  The point is more for the kids to pick out fun and nice stuff for their family members without making parents shell out a ton of money.  

I should have another craft tomorrow.  And the next day.  And the next day.  I'm really obsessed with this adventure.  


Sunday, November 11, 2012

Santa Shop Creations: Simple Star Ornaments


Sometimes simple is best. 

Shopping List:

15 wooden stars at Michaels - Reg. .29 cents each.  Sale .20 cents.  15 cents after 25% discount.
Gold Glitter paint (I had this)
Paint Brush (I had this)
Ribbon (I had this)
Hot Glue Gun (I had this)
Hot Glue Sticks (I had this)

Cost per ornament:  .15 cents


I just laid out the wooden stars on newspaper...


Then I painted them.  After they dried, I just hot glued the ribbon to them.  

I contemplated writing something on them or doing something else - but nah.  Why risk messing them up.  Just keeping it simple.  

Santa Shop Creations: Jingle Bell Earrings

The son's preschool is doing a Santa Shop.  They always do it - but this year, they are looking for donated crafts that the kids can buy instead of buying crap at Oriental Trading or the Dollar Tree.  So now, it's my mission to make a whole bunch of cheap crap that kids can enjoy buying for their families.

In the past, the school has kept everything really cheap - everything was .25 cents to $1.00.  So I'm assuming they are sticking to this plan.  I hope to whip up a bunch of stuff using things in my house and/or buying stuff on sale/for the cheap to donate.  I'm already having a crap load of fun.  I figured I would blog my stuff in case anyone out there is looking for cheap homemade christmas gifts for their own Santa Shop.  Also, my other son's primary school does this - but they contract out with a company and although I know it's meant to be fun and stuff for the kids - the stuff they buy is crap and it's pretty expensive considering and if the school ever decides to go a "donations" route - I'll have all my instructions and ideas here for me to come back to reference to.


My first project was Jingle Bell Earrings.  VERY EASY.


First I went to Michaels.  This weekend, there is a 25% off your total purchase coupon that can be used on sale items as well.  Jackpot!  

Here is my list of supplies:

1 55-count of Jingle Bells - Reg. $5.99, Sale $4.19.  $3.14 after 25% discount
1 60-count of Earring Hooks - Reg. $2.99.  $2.24 after 25% discount
1 20-yard roll of fish line - Reg. $1.49. $1.12 after 25% discount

Total OOP:  $6.50

Made 27 pairs of earrings or .24 cents per set.  Will probably be sold for .50 cents or $1.00 each.


This is really easy to do.  You just cut some fishing line and double knot the earring posts to the bells.  Tie them tight and trim the ends.  


To make "earring cards", I simply cut index cards that I already had in half.  Then I took a large safety pin and made 2 holes in them and inserted the earrings as if they were for sale at a store.  

There you have it.  My $6.50 in materials made 27 pairs of earrings.  Cheap & easy.  


Tuesday, September 18, 2012

Host a Cheap Angry Bird Birthday Party

So I recently threw an "Angry Birds" party for my 5 year-old.  I actually kept this party pretty cheap.  Here are some cheap ideas.  Some ideas can be incorporated into other themes.  From what I gather, the kids all had a good time and they didn't realize they were in the middle of a cheap-themed party.  The cheaper, the better!

1.  Invite less kids.  I usually (or in the past, I should say) let my kids invite whoever they want to parties.  This time, due to a hectic schedule and me not wanting to do a ton of work, I told my soon-to-be 5 year-old he could invite any 4 people he wanted plus their siblings.  So he chose 4 and that was that.  I have to say, having less kids around was a lot less stressful.  I'm not really a "kid person" - so it doesn't take much for me to get rattled when it comes to kids.  It was just less chaotic with less kids and more fun for me.  My son didn't realize the difference of having 8 kids vs. 20 kids here.  

2.  Cheap Bowling.  We dug out our Little Tykes bowling set that we got many moons ago.  We're missing a pin, so I just saved a soda bottle to incorporate.  We did this at the end of our driveway.  We threw down duct tape to show where the pins go and where the bowler stands.  That way, we adults could kind of be like, "Yeah, just do it yourself kid!"  This worked.  


3.  "Guessing Game".  We played "Guess How Many Angry Bird Eggs Are in Here?"  I bought a bag of beans at the Dollar Tree.  I took an old Rubbermaid container and just rubber banded it for extra support.  I guess I could have made it look "prettier" but that's what I did.  I printed out a picture in color.  That wasn't really "cheap" as color ink is expensive - but for my boy, I gave in to a little luxury.


I even made my kids do the "dirty" work - I had my little guy make piles of 5 beans and my bigger guy make piles of 10 beans.  So they essentially counted out the "eggs" for me.  


4.  Made a Life-sized Angry Bird Game - FOR FREE!  This was probably the biggest hit of the party.  The kids (ages 3-6) loved having 60 boxes to build and destroy over 2 hours.  I got some boxes at the grocery store and some at BJ's.  And I just kept boxes from the previous few weeks before the party.  After the party, I made my mother break them all down and threw them in the recycling pile on garbage day.


5.  Found someone (my father) who had baby chickens as entertainment.  My father had some baby chickens (or real life Angry Birds, if you will) so he brought them over and the kids could pet them and hold them gently.  For the most part, the kids were entertained by them for 3 minutes and then moved on to other things.  


6.  Fun with hubcaps!  This isn't a good picture - but I forgot to get one up close.  Last week, we threw a WHITE TRASH PARTY and I saved the 2 hubcaps that I found laying on the streets for my son's birthday party.  We hung them on trees in my yard.  Classy, right?  I printed out 2 Angry Piggies or whatever they are called and taped them to the center of the hubcaps.  I gave the kids frisbees to throw at the piggies.  This could work for any themed party.


7.  Made Angry Bird Bean Bags.  I initially had a game of "throw a bird at a pig" with buckets out.  I think the kids just turned this into "chuck the Angry Birds at each other."  Whatever works.  My picture is on it's side and I'm too lazy to fix it.


Making Angry Bird bean bags is simple - go to Michaels and buy some felt.  Felt is .29 cents a sheet and you only need 6-10 sheets depending on how many birds you want to make.  I just printed out some pictures of each bird and used that as a pattern.  I filled them with beans (the same Dollar Tree beans that we used for the guessing game).  We glued googley eyes, beaks and eye brows on them.  Then I hand sewed up the bottom where the beans went, and voila - I had 12 Angry Bird Bean Bags.  The Googley Eyes were probably the most expensive part of this project - I think I dropped just under $2 on them.  So it was probably just under $4 to make these.

8.  Have a "Make Your Own Pizza" Station.  My little guy loves going to Pizzeria Uno to do the "Make Your Own Pizza" meal.  So we brought that to his party.  This is really a pretty cheap thing to do.  You can buy an 8 pack of individual pizza crusts and sauce for $8.99.  Then you just pick up some cheese (I probably dropped about $5 worth of cheese on this shindig) and some pepperoni.  Probably $2 worth of Pepperoni.  The kids had a blast, it was easy, and it was cheap.


9.  When time is money, opt for a BJ's cake.  I just did not have time this week to do anything crazy with desserts.  Sometimes homemaking ain't easy - so we have to rely on store bought cakes.  I got this huge cake at BJ's for $12.99.  Had I made a cake, it would have easily cost me $6 in ingredients and you can't put a price on clean up and time when you're in a hurry.  So $13 was a deal for me.  The picture didn't come until after the first cut and someone said "Oops, I didn't get a picture of the cake yet!".  Why we really needed one is beyond me but that's what we do.


10.  Get creatively cheap with your goody bags.  I made individual piñata goody bags - WHICH YOU CAN READ ABOUT HERE.  I did these 4 weeks before the party when life wasn't so hectic.  The kids loved them.  


So there you have it.  Some cheap ways to entertain a bunch of kids for 2-3 hours, Angry Bird style.  A lot of these cheap ideas can be turned into other themes if so desired.  I want to be a White Trash Party Planner.