Showing posts with label Homemade Crap. Show all posts

Tuesday, February 26, 2013

Build a Geoboard for CHEAP! (What the HECK is a Geoboard?)

You might be asking yourself - "What the heck is a "geoboard", Bargain Becky?"  Well I'll tell you.  It's a mathematical manipulative used to explore basic concepts in plane geometry.  It consists of a wooden board with nails, half way driven in and rubber bands.  (I stole all of this off Wikipedia - my go to source to know EVERYTHING I need to know in life.)

The kids played with one at the Cape Cod Children's Museum over the weekend so I told my oldest I would make him one for his birthday party coming up.  We're doing some "science-y" things for the party in the backyard.  So today I made it - it's 3 feet by 3 feet (pretty darn huge) - and it cost me a whopping $4.22 out of pocket.  It will cost you more if you don't already have some of the materials.

How To Make a Geoboard?

(It took me about 2 hours in total and I had to drop $4.22 on paint and nails - already had the wood in my basement)

First, I started with a 3'x3' piece of wood I had in the basement.  This was scrap from some project we did way back when and I keep recycling it for birthday party things.  I think this is the 4th birthday party it's had use.  That's pretty good for a lonely piece of wood.


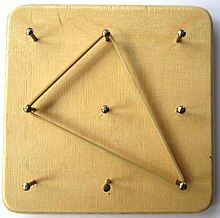
So I got my wood, the husband's drill, a pencil, and a level/ruler.  I marked every two inches on each sides and drew lines down the entire board.


You should have a huge grid.  Again, I measured 2".  


Then I drilled holes where every line intersected.  Since my board was really 35" by 37" (3'X3' is close enough) - I had 17 X 18 holes - or 306 of them.  I picked up this can of spray paint for .99 cents at Lowe's.  


I spray painted that sucker black.


I was originally going to use screws - but when I went to Lowe's - the cheapest ones they had in the size I needed were about $5.50 for 100.  I was NOT going to drop $22 on screws for this project.  So I went over to the nails and got a 1 lbs. box of Roofing Nails for $2.98.  I didn't have enough - but knew my husband had some in the basement.  There were probably about 260 nails in that 1 lbs. box.  So I nailed them in to all the holes (all 306 of them - by myself.  It was a great way to let out some aggression).


Then I got some rubber bands - and voila!  A fun and educational tool for the kids.  I'm going to pick up some misc. sizes/colors at Staples with my Staples Rewards for the son's birthday party.  

I know it sounds so simple and basic - but this thing can entertain kids like no tomorrow.  You don't have to be so extreme in making one - this one is pretty big but my motto is "Go Big or Go Home."  

Now you know what the heck a Geoboard is and you know how to make one.  Don't you feel all special now?  You can buy these too - but they are much smaller and cost a lot more.  


Wednesday, February 20, 2013

My Personal Christmas Club Bank - 2013

I got the bright idea to just sock away money every week this year for Christmas.  That way, come December, I have a pile of cash to just go crazy with.  I'm doing $10 a week.  Every week in 2013.  Since we're already in the 7th week of the New Year, I just threw in the money for the previous weeks.    That will give me about $500 for Christmas.  Which probably isn't enough for most people but should probably be close to enough for us.  We really don't go crazy with gifts.  

But I had to be creative with it.  If I just use a jar or envelope - I will dip into it.  And that defeats the purpose.  I need to give it meaning, so I got crafty:


I had an old shoe box and got some wrapping paper and the stuff to wrap it (have to give this a Christmassy theme).


I cut a small hole on top - big enough to get dollars through but hopefully small enough so I can't steal money out of it. 


I wrapped it, cut the hole out in the wrapping paper and wrote on it.  Giving it a subliminal message of a "Christmas Gift" will hopefully remind me of why I am doing this and will make me less prone to want to steal it.  The only real way to get the money out is to unwrap it.  


You probably can't see too well - but I will write the dates I contribute on the back of the box.  That way, if I fall behind, I'll know how much I need to catch up.  By December 1, I should have about 48 dates written on it.  

So sure - I could keep the money in the bank because I'm losing interest but honestly, interest rates suck now so it really won't break us losing out on the interest.  Plus - if it's just in the bank, I'll spend it.  I won't take it seriously.  Also - I'm getting my kids involved with it so they will see how much saving can add up.  

It's not too late for you or your children to do this yourself!  We have 42 more weeks until December 1st.  So how much could you or your kids save in this time?  Assuming you don't back date it and just start now, here is what you have the potential to save in your own personal Christmas Club:

$2 a week:  $84 (a great amount for kids to have!)
$5 a week:  $210
$10 a week:  $420
$15 a week:  $630
$20 a week:  $840
$25 a week:  $1,050

What a great & easy thing to teach your kids!  


Tuesday, February 5, 2013

Be a Fu-Fu Mom By Making Do with What You Have - Valentine's Day

The overachieving homemaker these days DOES NOT just buy a box of pre-printed Valentine's Day cards for their kids' class.  Oh no.  We're too good for that.  Really obnoxious moms make their kids bring in something to "wow" all the other moms...oops, I mean kids.

Here are some of the obnoxious and creative things that over-the-top homemakers are doing these days for Valentine's Day:


Picture with pop - more info on how to make this can be found at Design Mom.


Homemade Pops - From Family Kitchen


Ruler Cards - From Lil Sugar


Candy Robot Creations - From Prutsen


Melted Crayon Heart Cards - From PaperBlog


Well I want to be cool and hip!  However, I don't want to spend any money and I don't want more crap in my house (so I'm NOT buying any heart shape pan for anything).  My kids' schools don't allow food gifts - because obviously lollipops and conversation hearts make kids fat these days.  So I had to go with something non-food related.  In fact - I wanted to step up my game and get crap OUT OF MY HOUSE during this little project.  So I decided on a crayon project - because we own more crayons than the Crayola factory. 

First and foremost - do not believe the internet - you CAN NOT MELT CRAYONS IN THE MICROWAVE:


So my idea was to melt crayons down into multi-color crayons.  I have a heart candy mold - and some things that I did read on the internet said you can melt crayons in the microwave in candy molds, but nope.  You can't.  So I destroyed more crayons, cut them up in little pieces and used my mini cupcake pan to melt them.  I put them in a 200 degree oven for about 10 minutes.  Then they were melted and I let them cool on the counter top.  Used a knife to sort of pop them out of the pan.  This was relatively easy.  


I have a bunch of leftover cardstock that I had for a project way back when.  I used my large circular punch and punched out the number of circles I needed.  I had the 5 year-old sign the backs of all of them.


On the front with a Sharpie marker, I wrote "You Color My World, Valentine".  Isn't that all corny and wholesome?  


I had some leftover adhesive circles from a Christmas art project - so I used two on each mini crayon to attach them to the circles.  You can buy these if you really want to make these - they are much better than scotch tape.  


Voila!  Before long - we had our cards for 1 kids' class.  My handwriting isn't all that good - but whatever.  4 year-olds don't care.  

Not only did I not spend any money doing this project with the kids - but I used up some crap that was in my house.  Which is my ultimate goal in life - remove the crap from my life.  So sure - they aren't all heart-shaped or anything really festive - but I don't need a heart shaped pan or any other crap cluttering my already cluttered house.  

 Now I'm one of those cool, obnoxious, overachieving moms that everyone loves to hate.  I'm cool with that.  


Wednesday, September 26, 2012

My New Project: A Cheap Homemade Angry Bird Costume

The verdict is in for the 5 year-old.  He wants to be an Angry Piggy or whatever the pigs are called in Angry Birds.

I found THIS GREAT POST FROM "I'm the Crazy Lady with all the Babies" that I'll use as a reference.  She only spent $7 making it!  And it looks awesome!

Yahoo.  Well now I have a mission in life.  I like having missions.  I'm more productive in life that way.


Sunday, September 16, 2012

Homemade Individual Piñata Goody Bags

For my 2nd son's birthday, I thought, "How can I set the bar higher than any Homemaker has gone before?"  It was like I was on a mission to be a really obnoxious homemaker.  The answer was simple:  Individual Piñata Goody Bags.


We got to work and we made 10 circular pinatas.  The theme was "Angry Birds" - so this was relatively simple.  If you need help on homemade pinatas, well I wrote about that.  CLICK HERE to get directions and all my wise wisdom.


After I had three layers of piñata - I painted them with acrylic paint from Michaels.  I did 5 birds and 5 pigs.


My husband is the true artist in the family - so I made him paint faces on them. 


Before long, we had 10 Angry Bird themed pinatas.


I cut two small holes in each of them at the top - about 2 inches from the center.


I then cut out a rectangular portion of each of them with a sharp razor blade.


I then put a pipe cleaner in my little holes near the top.


I tied each end of the pipe cleaner to make a handle of sorts on each of them.


I reinforced my knots with a little hot glue - then you can see that you can hold them and they would be secure.


Here is my stash of "goody bags" ready to fill.  They aren't perfect, but it worked.  Life isn't perfect so that's okay.


And there you have 10 homemade Angry Bird piñata goody bags.  


We actually tied them to my clothes line outside - to make them part of the decoration of the party.  They were a big hit with the kids and adults alike.  Actually, I think most adults were like, "Are you f(*^*(& serious?  What the heck is wrong with just traditional goody bags?"  Whatever.  I'm a homemaker.  It's what we do.


Sunday, April 15, 2012

Homemade Piñata - A "How To"

No party is complete without a piñata.  For real.  I recently made a piñata.  My cost out of pocket was $2.49 ($1 for a pack of random balloons at the Dollar Tree and $1.49 for orange streamers).  Everything else, we had in the house.  Your typical store bought piñata will cost you $16.  You will not spend as much time fartsing around with a store-bought piñata, but some of us freaks like doing this kind of stuff.  So if you want to take on the homemade piñata, here's how I did it.  It may help you, it may not.


This piñata was Azrael the cat from the Smurfs.  So I paper mached a big balloon for the body, a smaller balloon for the head and a funky shaped balloon for the tail.  Before, I used a paper mache glue that you had to boil and whatnot.  I tried a simpler approach this time:  Combine equal amounts of flour and water and a tsp. of salt.  I think I started off with two cups each of water & flour with maybe 2 tsp. of salt (the salt prevents molding or something).  If it's too thick, add some water.  If it's too thin, add some flour.  You really can't mess this up.  The consistency should be that of thick glue - but it's not sticky like glue.  This concoction was much easier and I thought stronger than the heated up glue that I've used in the past.  For best results, dry between rounds (could take up to 24 hours) and let dry completely before assembling/decorating (I recommend 2 days to just let it really be dried and stiff). 


Another note (trick) I learned - when paper macheing, use a different color paper for the second round.  That way, you can see what you did and didn't do.  So I started with newspaper, then used blue all-purpose paper for the second coat (scored that free at Staples a few weeks ago) and then went back to newspaper for the third round. 


After 3 rounds of paper mache-ing, I hot glue gunned the pieces together.  I made a bigger hole in the body end to sort of stick the head in.  Be very liberal with the hot glue at this stage.   

I got lazy taking pictures of the next steps.  I then painted the entire thing orange with the kid's paint.  This paint is cheap - Reg. $1.99 for a bottle at Michael's.  

I bought a package of Orange streamers.  $1.49 for that.  The Dollar Tree didn't have orange, so I picked up a single roll at Stop & Shop.  1 roll was sufficient for this piñata so you really don't need a lot of streamer (this piñata was actually pretty big).  Then you have two options.  You can cut 1" pieces and glue them on individually, or you cut a long strip, glue onto the piñata and cut about every inch once the long strip is glued.  


After the strips of streamer were glued on, we attached ears that we made out of an egg carton and the husband painted a face on it using Testors paints he had.  


I then saved 4 toilet paper rolls.  I painted them with orange paint and once dried, glued streamer on it.  I then hot glued the legs to the body.  Again, I used a lot of hot glue.  While making the piñata, I inserted a metal bracket into it so the rope could be attached.  We hung it up on the tree in a pulley system so that way, it was hanging there during the party as "decoration" for most of it.  When it was time to do the piñata, we adjusted it down to a kid friendly level.  

Homemade Pinatas:  The best way to spend 5 hours of your life so that 20 little kids can beat it to death in 5 minutes.